Sciatica can leave you with a sharp pain when you move or even cough. While a day or two of such pain is manageable, for many the problem lasts much longer. There’s only so much that pain medication like aspirin or ibuprofen can do. So what are your options? If you are looking for natural remedies that can get to the root of the problem, yoga may have some answers.
What Is Sciatica?
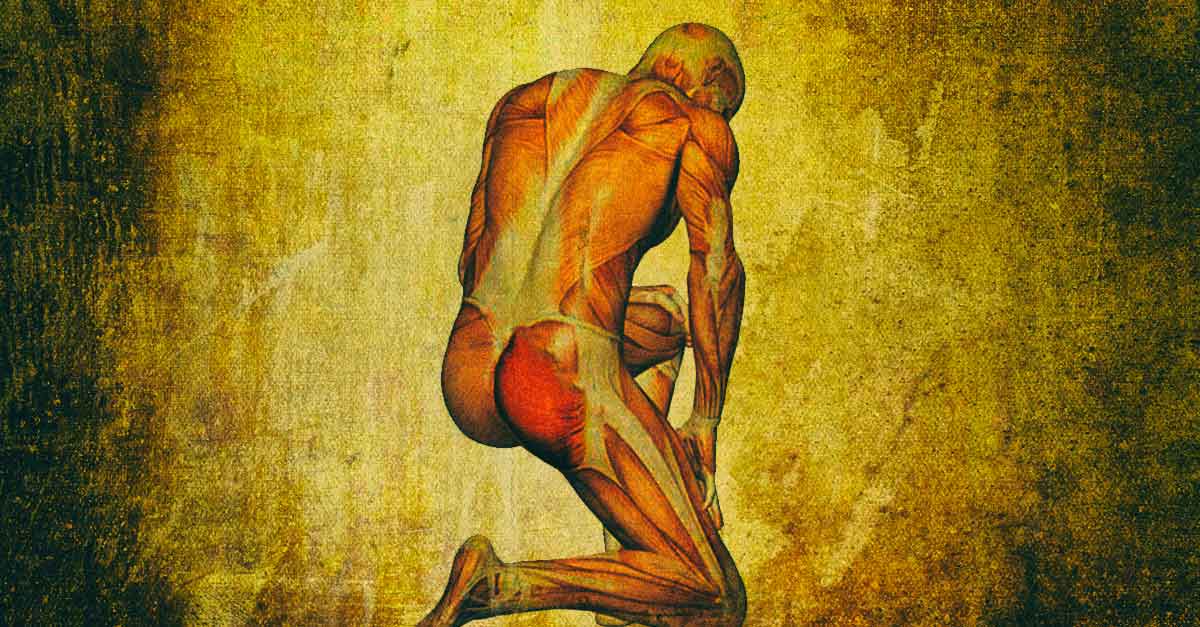
Sciatic nerve pain is a sharp, almost knife- or electric-like pain that runs down the back of the thigh and leg. If your spinal column has a protruding disk, it can sometimes press down on the nerve roots in your spine, causing sciatica. The bad leg cramp that results is usually worse when you move, cough, or sneeze. For some people, it can also result in a tingling or burning sensation down the length of the leg, not unlike the numbness from pins and needles. You might also experience some weakness.1
Note: Most sciatica pain eventually goes away on its own in a month or two. If your pain lingers beyond that, do get checked for underlying conditions that may need treating.
Benefits Of Yoga For Sciatic Nerve Pain
While mainstream treatment for sciatica is to just leave it to heal or to take nonsteroidal anti-inflammatory drugs like aspirin or ibuprofen for the pain, you do have other non-surgical options like yoga.2 Certain yoga stretches or poses for sciatica can help with the back pain and leg pain, making it a more manageable condition. Research has found that certain yoga asanas can help ease the katishool or pain in general, including when a patient bends forward – a movement that can be excruciating for some. In addition, other symptoms associated with sciatica – like tenderness or rigidity as well trouble walking – can be eased after practicing yoga asanas and stretches.3
Yoga Poses For Sciatica Pain Relief
Here are some of the best yoga asanas for sciatica pain relief. They can also ease your discomfort and restore movement. Be sure to begin these yoga exercises under the supervision of a qualified yoga instructor. If certain poses are hurting, don’t push yourself to do them as they could worsen your condition.
[expert_opinion expertname=’annieau’ opinion=”In order to get relief from sciatica for good, you should practice the poses consistently. The muscles surrounding the sciatic nerve can tighten and compress the nerve. Practicing these poses 3-4 times a week will loosen up the muscles.”]
1. Bhujangasana (Cobra Pose)

Bhujangasana has been used as a yoga-based treatment for “gridhrasi,” as sciatica is referred to in Ayurvedic medicine.4
How it helps:
The cobra pose helps strengthen the muscles of the back and improve spinal flexibility.5 The asana can also bring pain relief.6
How to do the asana:
- Lie down on your stomach, feet together and hands slightly below your shoulders, with the palm side on the ground.
- Let your forehead touch the floor gently. Now, start to raise your head off the floor inhaling when you do this. Lead with your nose and then the chin.
- Raise your chest off the floor, supporting yourself with your palms. Ensure you engage your back muscles to strengthen them. Breathe in deeply and hold this pose. Breathe in and out a few times.
- Now return to your starting position, exhaling as you do so.
- Again, raise yourself up while you inhale. This time, you should lift the entire trunk of your body up. Feel a gentle bend midway through your spine. Again, breathe in deeply and hold the pose. Breathe in and out a few times before releasing the pose.
- Exhale as you come back to the starting position.
- For the third phase, rise up again using your palms to support yourself and leveraging the strength of your back muscles. Your trunk should lift off so that you feel the spine stretch all the way from the neck down to the base. Breathe in deeply and hold the pose. Breathe in and out a few times before coming back to the starting position as you exhale.
2. Apanasana (Knees-To-Chest Pose)

Apanasana is among the recommended poses for soothing sciatica-related pain and numbness.7
How it helps:
A yoga pose designed to ease lower back pain, the apanasana can help warm up your lower back.8 9 The focus and gentle breathing combined with the attention on the lower back can calm the mind and body.10
How to do the asana:
- Lie on your back and pull your knees up to your chest, keeping your legs bent. Your feet should be off the floor.
- Put your right hand behind your right knee and the left hand behind the left knee to support it.
- Exhale as you pull your thighs slowly closer to your chest. Your shoulders should be relaxed and touching the floor. Use your arms to pull your legs and let your lower back press into the floor.
- Inhale as you go back to the starting position.
3. Adho Mukha Svanasana (Downward Facing Dog Pose)

Improve your body mechanics and posture using this asana.11
How it helps:
An energizing pose, this asana can help stretch the body and calm the mind as it strengthens the legs. It can also relieve back pain associated with your sciatica.12
How to do the asana:
- Go down on your hands and knees, aligning the hips above the knees and hands ahead of the shoulders. Keep your hands parallel and palms spread.
- Exhale lifting your knees off the ground with the knees just gently bent at first. Your heels should rise up off the ground. Feel your tailbone lengthen away from the rear pelvis and let it press into the pubis gently. Raise your sitting bones up to the ceiling and your inner legs up to the groin area.
- Exhale again as you push the top of your thighs backward, making your heels stretch to the floor. Let your knees straighten out fully. Narrow your pelvis.
- Firm up your outer arms and let the bottom of each index finger push into the floor. Feel the lift in your inner arms all the way to the top of your shoulders. Widen your shoulder blades. Ensure your head remains aligned between your upper arms and doesn’t droop.
- Hold for 1 to 3 minutes before exhaling and bending and dropping your knees gently back to the floor.
4. Supta Padangusthasana (Reclining Hand-To-Big-Toe Pose)

This sciatica-beating asana can offer a lot of relief and help stretch the affected muscles, easing the cramp-like pain. To make it easier on yourself, you could elevate your lower leg by placing the heel off the ground on a block or book.13
How it helps
Supta padangusthasana helps relieve sciatica as well as back pain by stretching your hips, thighs, hamstrings, and groin area. It also makes your knees stronger.14
How to do the asana
- Lie on your back legs extended. Exhale as you bend your left knee and pull your thigh in toward the torso. Pull your thigh close to your stomach and press the other thigh into the floor.
- Use a strap looped around the left foot and hold this with both your hands. Breathe in as you straighten your left knee. Let your heel press up to the roof. Now move your hands up the length of the strap until your elbows are straight. Allow your shoulder blades to broaden as you press them gently into the ground. Your collarbones should also widen away from your sternum.
- Extend your leg all the way to the back of your left heel so the back of your leg is fully lengthened. Now let the top of your thigh bone fall deeper into your pelvis and bring your foot closer in the direction of your head to maximize the stretch on the back portion of your leg.
- Hold for a few minutes. First, release the strap. Then hold for another 30 seconds. Now exhale as you bring your leg back down.
5. Shalabhasana (Locust Or Grasshopper Pose)

Another effective yoga asana for sciatica is the shalabhasana.15 Using a folded blanket below the ribs and pelvis may be more comfortable for beginners.
How it helps:
The grasshopper pose helps improve circulation to muscles in the hip region and strengthens the muscles of the lower back.16
How to do the asana:
- Lie down on your stomach, arms straight alongside your torso, with the palms facing up. Allow your forehead to rest on the floor. Your thighs should rotate inward and big toes can turn to each other.
- Exhale as you raise your head, then upper torso, followed by your arms and legs away from the ground to rest your weight on your front pelvis, belly, and lower ribs.
- Lift the legs, feeling the back of your legs lengthen. Ensure the big toes remain facing each other. Your buttocks should be firm.
- Lift your arms up so they are parallel to the ground. Picture pressing your arms up to the ceiling against some resistance like a weight on your upper arms.
- Look slightly up or ahead without jutting your chin out or squashing the back of your neck. Your neck should remain long at the back. Hold for 30 to 60 seconds before exhaling. Breathe in and out a couple of times before returning to your original position.
6. Setu Bandha Asana (Bridge Pose)

The bridge pose helps you cope with sciatica. If you find it hard to do, use a bolster for support. Simply place it below the sacrum – the triangular bone at the bottom of your lower back.17 You could also use a blanket rolled up below your neck for added support.
How it helps:
The bridge pose helps stretch the neck, spine, and chest, aside from reducing back pain and reviving your legs. The asana also helps calm the mind.18
How to do the asana:
- Lie down on your back, knees bent and feet flat on the floor. Try and bring your heels as close as possible to your “sitting bones” as you can.
- Exhale as you press your inner feet as well as arms into the ground. Push up from your tailbone to your pubic bone. Lift your buttocks off the ground, ensuring thighs and inner feet remain parallel. Hold your hands clasped below the pelvis, your arms extended.
- Keep raising your buttocks until your thighs are parallel to the ground. Align your knees so they push away from the hips but remain over the heels. Feel your tailbone lengthen to the rear of the knees. The pubis should be lifted toward your navel.
- Raise your chin a bit so it is away from your sternum. Now try and press the top of the sternum in the direction of your chin. Firm up your outer arms, feeling the shoulder broadening. Attempt to raise the space between your shoulder blades near the nape of your neck into your torso. Hold for 30 seconds to a minute.
- Exhale as you roll the spine slowly back to the floor.

References