If you’re a busy woman keen to make fitness a priority, bodyweight exercises may be the answer. These exercises use your own bodyweight to give you a good strength training or resistance workout. A quick and efficient way to tone up, these can be done anytime, anywhere. There isn’t even the need to cough up for a gym membership or head to a local fitness center!
Women can do many of the same bodyweight exercises men do to build muscle tone. So why have a bodyweight exercise regimen specifically for women? That’s because women generally tend to perceive certain body parts as problem areas – for instance, the hips and legs. Who wouldn’t want toned legs in a dress or shorts! Also, things like the menstrual cycle, childbirth, and childrearing can take their toll on the body, making core exercises really vital to staying strong. With age and babies, it’s also important to keep your breasts well-supported. And that’s where chest exercises come in, helping maintain muscle definition and prevent sagging.
Do not try and compare your performance to that of men around you or even to other women you know. Each person’s body is different and responds differently to the exercises. Slowly, you will be able to work out a routine that suits you.
1. Warm Up Before You Begin And Cool Down After The Workout
It is important to warm your muscles up and get the circulation going with a 5–10 minute warm-up before a workout. This could be as simple as just walking.1 Similarly, end workouts with a cool-down to gradually bring your heart rate and blood pressure down. Stretch to help ease any possible muscle pain and stiffness.2
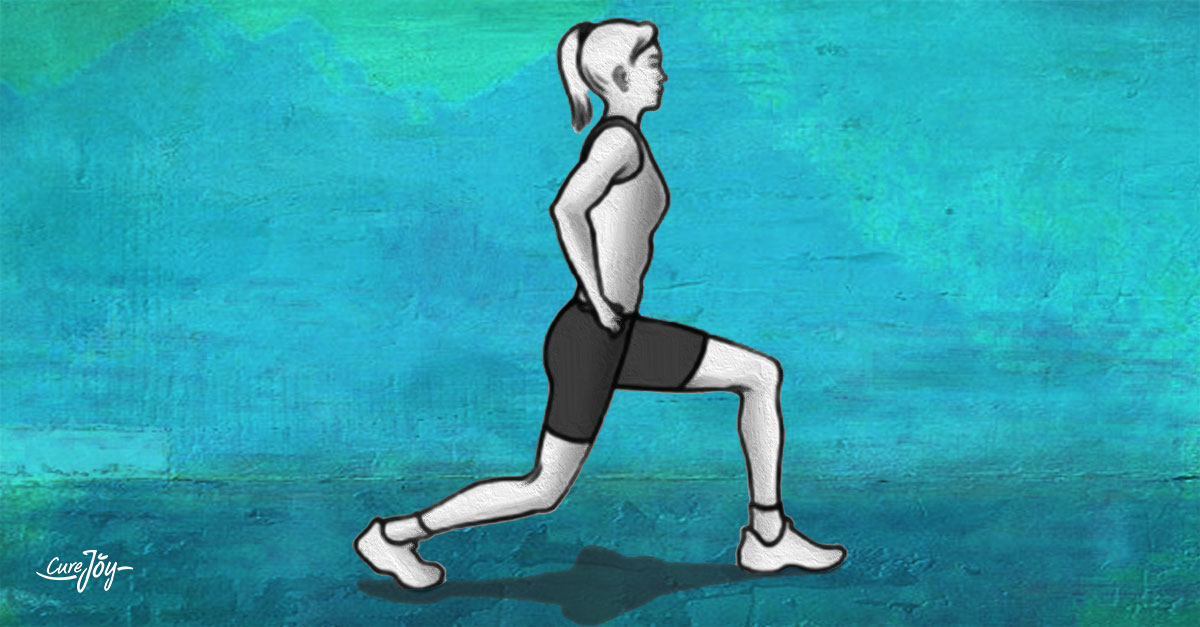
2. Tone Up Your Legs And Glutes With Lunges
Keeping that lower body toned and fit is a priority for a lot of women. Sedentary lifestyles and desk jobs have also meant that, in general, we as humans don’t walk as much as we used to a few decades ago. So how do you get that well-toned derriere and legs that look great in a figure-hugging cocktail dress? Lunges!
Why Lunges And Glute Bridge: According to researchers, what makes lunges especially compelling is that they replicate normal human body movement better. Unlike workouts where you stand with your feet together, in lunges, you move one lower limb at a time – much as you would when you walk, run, or jump. These bodyweight lunges work your thighs or quadriceps, hamstrings, and buttocks.
- This alternating between legs means you can spot any muscular imbalance between both legs and work on building up both equally.
- You can also focus fully on the muscle group in that one limb and ensure you get your form right.
- Plus, they are more demanding on your balance and stability as a whole and help build this through from your torso to the lower body.
- Lunges also improve flexibility in your hip joints, knees, and ankles.3 4
The glute bridge, meanwhile, tones up your buttocks, thighs, pelvic muscles and strengthens the spine and lower back. It is even known to help ease menstrual cramps.5
1. Bodyweight Lunge: Here’s how you do a straightforward lunge. Work at doing 10 on each side.6

- Stand with feet together, shoulders pulled back and abdominal muscles engaged/braced.
- Step forward with your right leg, lifting it up. Pause for a moment to retain posture and balance, without tilting to one side, before bringing it down to the ground.
- Bend forward at the hips and drop your hips down to the floor as you move your leg forward. Bend both knees as far as you can as you do this.
- Keep lowering your body until the front thigh is parallel to the floor. If that’s not possible, go as far as you can without pain or discomfort. Your front knee must remain behind your toes.
- Push up from this position, keeping the heel of the front foot down into the ground and then straighten the leg. Leverage your buttock and thigh muscles to return to the start position.
2. Walking Lunge: The walking lunge is a variation of the bodyweight lunge and can be done 10 times on each leg.7

- Stand upright, ensuring there is a clear space straight ahead of you for a good distance.
- Keep your feet shoulder-width apart, engage your buttocks and abdominal muscles, and keep that chest out.
- Step forward with your left foot – make a big stride, lower your knees so both are bent at right angles. Your thigh needs to be parallel to the floor as with the other lunge.
- This is where things change a little. As you push away from the ground with your right foot, straighten your legs so you’re standing upright and immediately move that right foot into the next lunge.
- You are in effect moving forward with each repetition instead of returning to your start position.
3. Glute Bridge: Another exercise that targets the hips, buttocks, and thighs is the glute bridge. Here is how you do it:8

- Lie on your back with knees bent, legs hip-distance apart and feet flat on the mat, arms by your sides on the floor/mat. Contract the muscles of your abdomen as you flatten your lower back into the mat/floor.
- Exhale as you hold that abdominal contraction, raising your hips off the floor by contracting your glute/buttock muscles. Use your heels to stabilize yourself. Don’t overreach with your hips because it will cause your back to arch too much.
- Inhale as you bring your body down to the start position.
3. Work On Your Legs, Back, And Core With Squats
Squats use your body weight to tone up multiple muscle groups. You essentially have to lift your body from close to the ground up to the standing position against gravity. As you work your core, you should also feel stronger overall. A squat is also considered a functional exercise – one which mimics real life movements as opposed to artificial exercise style positions that are never done in real life. And these are believed to be much better because you’ll be moving muscles as they will be in normal life – squatting to get something that’s fallen, crouching near the ground to play with a little child or a pet, and so on.
Why Squats: The good old squat is an easy way to strengthen your back, core, and, of course, your buttocks and leg muscles. While it might seem like its mainly working your legs, you can’t do one right unless you have engaged your back and core too.9
1. Squats: Here’s how to do a squat with just your bodyweight for resistance. Do 6 to 10 repetitions depending on what works best for you – fewer reps and more sets or more reps and fewer sets.10

- Stand with feet a little more than hip-distance apart, your toes gently turned out, arms by your sides, and palms of the hands facing in. Pull your shoulders back. Engage your core/abdominal muscles and stabilize your spine. Your chest should be out and up. Shift your weight into your heels.
- Inhale as you lower your hips gently, shifting them back and then down so your hips and knees have a hinge-like movement. Your knees may start to move forward, try and keep this movement to the minimum and use your core muscles as you do so. Your back must stay flat.
- Keep lowering until your thighs are nearly or fully parallel to the ground. Avoid letting your feet move. Your knees must remain lined up over your second toe of each foot.
- Exhale as you extend your knees and hips and push into the floor through your heels to rise up. Keep extending till you are upright again.
2. Prisoner Squats: In this variation of the squat, you lock your arms into a fixed position and challenge your body to stabilize itself from the core. Do 6 to 10 repetitions as with regular squats.11

- Stand with feet shoulder-width apart.
- Raise your arms up so your fingers lie flat, palm-side up, at the back of your head. Picture an episode of a cop show where the suspect has just been arrested and told to put their hands behind their heads. That’s what this needs to look like.
- Now lower your body down as far as you can go by bending at the knees and pushing hips back.
- Hold for a few seconds at the lowest position you can muster before pushing your body back up to the start position.
4. Tone Up Your Chest Muscles And Arms With Push-Ups
A well-toned torso and well-worked out chest muscles can help your breasts sag less and seem firmer, giving you a better silhouette. You can achieve that with push-ups, which need no barbells or machinery. Plus, they also help you tone up those arms, giving you a fit, sculpted look.
Why Push-Ups: Push-ups actively engage your pectoral or chest muscles so they can give your breasts the support they need. They also help strengthen your shoulders and arms. If you can manage to do suspended push-ups, with your feet suspended at an elevation, that’s even better. If not, stick with straightforward standard push-ups. They may not engage the chest muscles as much as a barbell bench press, but that’s nothing a few additional repetitions can’t fix.12
Push-Ups: Grab a mat to help make this exercise easier on your knees and hands. Then follow these steps:13

- Go down on all fours, with your feet together, toes pointing to your shins, hands shoulder-width apart and palms flat on the mat and aligned just below your shoulders. Your knees and hips must not bend. Your torso must be stiff – engage your core/abdominal muscles to do this. Keep your head aligned with the spine.
- Slowly bring your body down to the floor, ensuring your head stays aligned to your spine and your core is engaged. Your lower back mustn’t sag and your hips should not move upward. Your elbows can flare out.
- Keep lowering your body until you feel either your chin or your chest touching the mat.
- Now press your body up through your arms as you retain the strength of your torso and alignment of head and spine. Again, ensure your hips don’t hike up and that your lower back does not sag. Keep pressing up until your arms are totally extended at the elbows.
5. Work Those Abs With Crunches And Planks
A strong core can help improve your balance and posture, and even reduce the risk of lower back pain. The American Council on Exercise carried out a study to investigate what ab exercises are best at doing what they’re meant to – activate your abdominal muscles and engage them in the workout. Abdominal crunches actually edged out other abdominal exercises, including those using special equipment designed for your abs! Even some formidable competitors for the top spot like the yoga boat pose and the side and front plank lost out.14 15
Why Crunches And Planks: So what is it that makes crunches or planks better than everything else? One big reason is that you don’t need to invest in fancy equipment or sign up at a gym to gain access to this equipment to work your abs. The best exercise – the crunch – is something you can do anywhere at all, requiring nothing more than your will to exercise. That said, for a full workout of all your ab muscles, combine this with the plank. Doing so should help you not just make those abdominal muscles stronger, but also help ease back pain.16
1. Crunches: Follow these steps and be sure that you get your form right so you don’t strain your back or neck.17

- Lie down on your back on a mat, knees bent, your feet flat on the floor. Your heels should be about 12 to 18 inches from your tailbone.
- Put your hands behind your head. Be sure not to arch your lower back, your shoulder blades should be squeezed together with the elbows pulled back. Your head should be in line with the spine.
- Breathe out as you contract your core/abdominal muscles. Flex your chin a little (pull it to your chest) and begin curling your torso to your thighs. Your neck must remain relaxed and lower back, tailbone and feet should stay in contact with the ground or mat. Keep curling till you feel your upper back lift up off the mat/ground. Pause and hold this for a moment.
- Breathe in as you uncurl your torso and lower yourself down to the mat slowly and in a controlled manner. Again, be sure to check that your lower back, tailbone, and feet are in contact with the mat throughout.
2. Plank: Done correctly, the exercise doesn’t just work that core, but also tones up and strengthens your upper back, shoulder, and hip muscles.18 Here’s how to do it:19

- Lie face down on a comfortable mat or on the ground.
- Raise your body weight off the ground on your elbows, so they form a 90-degree angle with your forearms flat on the ground. Line them up so that your elbows are lined up below your shoulders. Your back must remain flat. Keep your chin tucked in close to your body.
- Engage your abdominal muscles, contracting them.
- Hold the position for 15 seconds at first and later build up to longer periods.
6. Strengthen Your Back With Supermans, The Cobra And Cat-Cow Poses
Working your back muscles can reduce your chances of having back injuries and pain associated with that and can also counter the stresses of a sedentary modern life. As you build muscle in the back it helps the bones strengthen too, improving your posture overall. This should help you look better and feel stronger too.20The Superman, Cobra, and Cat Cow are all great bodyweight exercises that are also done as part of most yoga routines and can help strengthen your back.21
Why Superman, Cobra, And Cat-Cow: The Cat-Cow pose works your back and chest muscles, the Cobra engages your core and your back, and the Superman works your hips and buttocks, along with your shoulders and back.22
Supermans: Grab a mat and lie face down and follow these steps to do a Superman:23

- Stretch your legs out behind with toes pointing to a wall that’s behind you. Your arms must be stretched out overhead with the palms facing one another. Your neck must be relaxed and the head aligned with the spine.
- In the upward phase, you should exhale as you stabilize your spine, and engage your core and abdomen. Reach your legs away from the torso of your body until they rise a couple of inches off the ground. Let your arms “float” a little off the ground too and ensure they remain straight. Your legs must be straight too. Your head should not drop down or be lifted up and your back mustn’t arch. Hold this pose for a few seconds.
- In the downward phase inhale as you bring your arms and legs back down to the start position. Your hips and lower back must not move.
Cobra: The Cobra pose is a back strengthening exercise that also helps ease menstrual cramps.24

- Lie down on your stomach with feet together and hands by your shoulders and slightly below, with the palm side on the ground.
- Let your forehead touch the floor gently and start to raise your head off the floor inhaling when you do this. Lead with your nose and then the chin.
- Raise your chest off the floor, supporting yourself with your palms. Ensure you engage your back muscles to strengthen them. Breathe in deeply and hold this pose. Breathe in and out a few times.
- Now return to your starting position, exhaling as you do so.
- Again, raise yourself up while you inhale. This time, you should lift the entire trunk of your body up. Feel a gentle bend midway through your spine. Again, breathe in deeply and hold the pose. Breathe in and out a few times before releasing the pose.
- Exhale as you come back to the starting position.
- For the third phase, rise up again using your palms to support yourself and leveraging the strength of your back muscles. Your trunk should lift off so that you feel the spine stretch all the way from the neck down to the base. Breathe in deeply and hold the pose. Breathe in and out a few times before coming back to the starting position as you exhale.
Cat-Cow: A popular yoga asana too, the Cat-Cow is featured in the American Council’s library of exercises for the back. Here’s how you do them:25

- Go down on all fours in a kneeling position on an exercise mat. Your knees must line up below the hips and your wrists below your shoulders. Fingers must point forward.
- Engage both your abdominal muscles and your core. Picture a corset around your midriff and imagine it tightening. Your spine must remain neutral – neither arched not sagging. Pull your shoulder blades back to your hips.
- For the Cat part of this exercise, exhale and tuck your tail under as you engage your abdominal muscles pushing the spine up to the ceiling. You should resemble the outline of an angry cat. Hold for 10 to 15 seconds letting your head reach for your chest, neck lengthened.
- In the Cow part of the movement, you should use your lower back and abdominal muscles to tip the tail to the ceiling. This will increase the arch of the low and mid back. The abdomen should stretch towards the ground. Pull shoulder blades down the back. Hold this for 10 to 15 seconds before coming back to the start position.

References